Sunday 5 December 2021

React native / React / javascript - must know

1. var, let and const ?

remember that 'let' and 'const' have block level scoping but 'var' have global scope.

2. javascript map function 

https://www.w3schools.com/jsref/jsref_map.asp


3. What is '...' in javascript ? 

https://stackoverflow.com/questions/40124680/what-does-in-react-native-mean


4. async and await - future of async programming at-least for now ?

5. useEffect() , useState() , return what is called when ?

6. useRef(), useCallback(), useMemo ?

https://www.geeksforgeeks.org/react-js-useref-hook/

7. what is '?.' in javascript ?


8. when to use self executive function in javascript ?

8. useEffect vs useFocuseffect and useCallbacks 

https://reactnavigation.org/docs/use-focus-effect/

9. Arrow function =>

10.  Some very useful react native libraries


Sunday 26 September 2021

A Guide for trouble shooting react native errors

Well , while you download react native project from somewhere and try to run it is whole different game of errors and bugs , here I am trying to compile basics steps to try.

Here official trouble shooting page : https://reactnative.dev/docs/troubleshooting


  1. know the folder structure : https://medium.com/habilelabs/best-folder-structure-for-react-native-project-a46405bdba7
  2. Know your npm version : npm -v
  3. Know you node version : node -v
  4. Know your react native version : npm react-native -v
  5. remember there are 4 key folders : android , ios , nodejs, and root folder.
  6. package.json in root folder contains all information about packages to be installed
  7. Run : npm install , inside root directory.
  8. if this installed successfully : npx react-native run-android
  9. watch out any error at this point

Thursday 23 September 2021

Getting started with React native on windows in late 2021 in just 20 minutes !!!

So, there are lot of react native articles available online so won't be wasting your time and my time. But basically mobile development is becoming too complex. And there is web development as well.

So, Facebook guys came up with react native , write once deploy everywhere !!! Android , iOS , web !!!

This is more advance then earlier attempt made for cross development like Xamrine or phonegap. 

Currently flutter is closest competitor led by google, let's see what happens in future. But currently react native is most popular , see below image.


Note that you can start with expo CLI or using react native CLI , I would highly advice start with react native CLI. Just forget anything like expo CLI exists.

Read this if you don't believe me : https://medium.com/nerd-for-tech/expo-v-s-react-native-cli-what-to-choose-and-what-to-stay-away-from-85afc81597bc


These are quick steps to start with react native. 


Prerequisites :

* Note that you need a good machine if you are doing android development like 8GB RAM , 256 GB SSD, 4 core processor.

* a good broadband internet connection


1) Install nodejs : https://nodejs.org/en/download/

when asked about Chocolatey , install it.

2) Follow this link : https://reactnative.dev/docs/environment-setup ( keep this article open )

choco install -y nodejs.install openjdk8

Remember : start CMD with administrator mode.

3) Download and install android studio : https://developer.android.com/studio

4) Set up all the path variables described in above article.

5) Create a folder.

6) Start a new react native project called AwesomeProject : npx react-native init AwesomeProject

7) Prepare your phone for debugging ( note : don't waste your time in setting up virtual machines , this is 2021 and you must have android phone , if you want to be developer. )

https://developer.android.com/studio/run/device

Basically unable developer options in your device by tapping build version 7 times , and then turn on USB debugging in developer options.

8) Run Metro Server : npx react-native start

9) Run your react native app on android phone : npx react-native run-android

10) Run your react native app on android phone : npx react-native run-ios


Congratulations !!! you have set up your system for react native.

Now when you are developing code don't forget to create a repository on github to maintain your code. Read article on this blog for quick start on github.

If you face any difficulty let me know in comments.

Note : if you are using "yarn" just write yarn instead of npx.


some helpful links:

1) https://stackoverflow.com/questions/58120990/how-to-resolve-the-error-on-react-native-start


Sunday 27 June 2021

An Ultimate guide for embedded/firmware engineer interview preparation


Field of embedded engineering is quite challenging and demanding. You need to be master of both the worlds software and hardware.

Here I have tried to compile entire list of my blogposts which can help you in preparation of embedded/firmware interview.

Note that most of the questions were asked in a real interview to me or some of my friends. So, you might have skipped lot of things in your life but don't skip here.


1) Prepare your self for C language questions :

Pro tip : Out of all interviews I have seen there are some generic questions asked on repetitively , like volatile , extern , static , or basic compilation flow etc , so prepare well for this basic questions.

pandya electronics: C interview questions - Part 1

pandya electronics: C interview questions - Part 2

pandya electronics: C interview questions - Part 3

pandya electronics: C interview questions - part 4


2) Understand basics of compilers and cross compilers :

Well you need to have knowledge about your favorite IDE like keil , IAR , eclipse etc. But you should also have very good understanding of how compiler works , how code optimization works , what is linker , preprocessor etc.

pandya electronics: Compiler and optimization related questions - part 1


3) Real time operating systems :

Accept it or not RTOS is integral part of embedded system and is a must have skill in your resume. I recommend no mater what prepare RTOS questions in your interview.

pandya electronics: Real time OS and Computer architecture questions - part 1


4) Prepare Hardware related stuff :

Well embedded engineering is half without hardware , and hardware knowledge is must for any engineer.

pandya electronics: Electronics/Embedded/Electrical questions - part 1


5) C++ and STL :

Now days there is lot of embedded development happening in C++ as well.

pandya electronics: C++ STL and data structures - part 1


6) if you are preparing for energy meter company like landis and gyr , or secure meters :

pandya electronics: Power and energy measurement basic theory and key points


Soon , I will try to add posts for niche domain like Memory domain, Bluetooth, wi-fi , audio , video , USB, testing , devops etc. Let me know if you have suggestions. 

Monday 14 June 2021

How to use multiple python versions on same machine with virtulenv , for windows.


In this blog post we will see how to use different python versions on same machine using virtualenv. In this example we will use python 3.8.

virtualenv for python is like sandbox which completely isolates your development environment. so that you can maintain different python versions for your different projects.


1) install python 3 from here : https://www.python.org/downloads/

note: do not add this to path variable , it can create issue at later stages. Also keep note of installation path for current python installation , we would need this while creating virtulenv. 


2) open cmd and install virtualenv : pip install virtualenv


3) create a folder where you want to create your virtual env.


4) create a virtual env named "venv" with python3 : virtualenv venv -p C:\Python3\python.exe


5) start virtual env : .\venv\Scripts\activate.bat


6) if you have  "requirements.txt" then install your python modules from "requirements.txt" : pip install -r requirements.txt


7) if you wish to create "requirements.txt" : pip freeze > requirements.txt


8) stop current virtual env : .\venv\Scripts\deactivate.bat


Ref : https://www.c-sharpcorner.com/article/steps-to-set-up-a-virtual-environment-for-python-development/

Let me know what topics you would like to read.

Tuesday 9 March 2021

How to connect to the actual HDFC credit card customer care person and not the tele-caller software #personal

I thought as my blog doesn't gather much traffic , I can write my personal useful stuff here as well, it may be helpful to someone.

I had some issues with my HDFC credit card and I wanted to talk with the real customer care personal , but it's not easy to find the way for this.

So, here are the steps : 

1) use this link to find your customer care number try to call from registered number:

HDFC Bank Customer Care Number - Call Our 24x7 available Customer Care Numbers across India

2) for credit card dial 2

3) for credit card balance , payment and statement information dial 1

4) last 4 digit followed by # key.

5) credit card number with # key

6) validate with your pin dial 1

7) thank you, your credit card is validated

8) it will say your credit card limit

9) dial 2 for last 10 unbilled transaction.

10) complaint for card dial 4.

at this point you will be connected to customer care executive , also they reply of tweeter , so you can try that as well. @HDFCBank_Cares.


Saturday 13 February 2021

GIT cheet sheet


Command line instructions

Note: 
If you create your repo on github / gitlab with readme.md . and have your local repo and try to do pull then you will face : fatal: refusing to merge unrelated histories.

Read this SO answer to resolve this : 

LF will be replaced by CRLF:

Complete cheat sheet :


Git global setup
git config --global user.name "Parth Pandya"
git config --global user.email "parth@gmail.com"
Create a new repository
git clone git@gitlab.com:parth/test.git
cd test
touch README.md
git add README.md
git commit -m "add README"
git push -u origin master
Existing folder
cd existing_folder
git init
git remote add origin git@gitlab.com:parth/test.git
git add .
git commit -m "Initial commit"
git push -u origin master
Existing Git repository
cd existing_repo
git remote rename origin old-origin
git remote add origin git@gitlab.com:parth/test.git
git push -u origin --all
git push -u origin --tags

Sunday 3 January 2021

Power and energy measurement basic theory and key points

 1) Key point:

Voltage measurement is done in parallel

And Current measurement is done in series.


2) ADC is used for energy measurement:

> Sigma delta is preferred over SAR ADC as; sigma delta provides better accuracy.

> For low frequency high accuracy sigma delta ADC is best choice

> For higher sampling rates let say more than 16kHz, SAR ADC is better.

> Typical range for SAR is 10-12 bits, typical range for sigma delta is 20-24 bits.

> MSP430i2021 is chip with dual channel sigma delta ADC.


3) ADC output depends upon resolution and reference voltage:

https://learn.sparkfun.com/tutorials/analog-to-digital-conversion/all


4) Nyquist criteria:

As per Nyquist criteria your sampling frequency needs to be twice than original signal being sampled to recontract signal properly.

However practical sampling rates are always higher than Nyquist rate.

For example, to measure a 50Hz voltage signal, 4kHz sampling might be used.


5) Harmonics:

Power can be defined in terms of fundamental or total.

Fundamental power is power at 50hz or 60hz , total power consider harmonics as well.

Harmonics are multiple of fundamental waves like 150Hz , 250 Hz. These are odd harmonics.

Note that even harmonics do not have impact on shape of signal. Because impact of positive cycle is cancelled by negative cycle.

Harmonics are also a decisive factor while power calculations.

Odd harmonics change the shape of signal. But even harmonics will not.

Similar way 3rd harmonics have most impact, then 5th and further on , going ahead harmonics have lesser and lesser impacts in power calculations.

Presence of harmonics decides quality of power. More harmonics bad quality, less harmonics better quality.

Harmonics are introduced by capacitive and inductive loads.


6) Aliasing effect:

Aliasing is effect, where higher frequency signals overlaps on lower frequency signal. This can occurs in real life like 250Hz signal can appear on 50Hz, 450Hz signal can appear on 250Hz.

It is complecated to understand but you can consider a paper folding phenomenon to understand aliasing effects.

< https://www.youtube.com/watch?v=pAPz5ivJaWk >


7) Anti-aliasing filters:

As we discussed earlier , as we move to higher frequencies in terms harmonics , the effect of those harmonics becomes weaker , so even though there would be higher frequencies falling on fundamental 50Hz, their effect will be lower say 0.0001%.

So basically anit-aliasing filter is a low pass filter ( which blocks any higher frequency ) . Anti-aliasing filter is designed using capacitor and resistors.

A filter has cut-off frequency. Ideal filters have brick wall type response, but practical response have sloppy response.

Filter cut-off frequency is decided based on how many harmonics you want to measure.


8) Filter design basics:

Remember that a capacitor blocks DC signal / low frequency signal and allows high frequency to pass through.

That is why a capacitor is placed across a “full wave rectifier” which provides path to ground for sine waves and we get high quality DC signal.

On other hand, inductor allows to pass DC signal and blocks ac signal.

Here DC can be taken as low frequency and AC can be taken as high frequency.

Here is one popular picture to remember this :-)


At high frequency capacitor act as short and at lower frequency capacitor act as open.


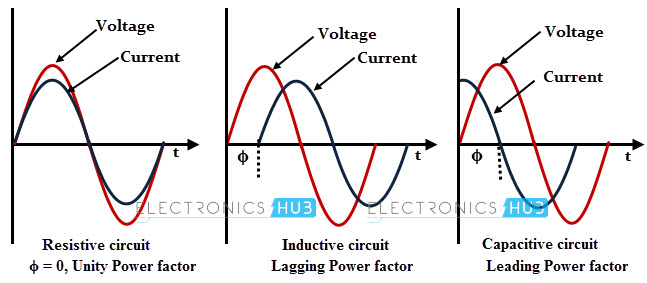
9) Leading and lagging current:

In energy measurement energy is basically power integrated over time and power is basically voltage multiplied with current.

So, between voltage and current you need to select a reference.

Mostly voltage is taken as reference.

So only current leads or lags, not voltage as voltage is reference.

Remember the word CIVIL -> C IV means in capacitive load ( C ) I leads V

                                                    VI L means in inductive load ( L ) I lags V.

Pretty easy haan


10)  Doing some FFT :

There are 2 domains in signal processing time domain and frequency domain. The real world is time domain.

Imagine in live music performance, Tabla ( kind of Indian drum ) being low frequency and guitar being high frequency, can you tune your ear to listen them separately ?? not possible right ?

Human ears have a range a of frequency 20 Hz to 20 kHz and we hear that all.

So , time domain is very easy to understand just put time ( t ) on X axis and draw the signal. In time domain "shape" is most important.

Now , frequency domain , as this is frequency domain we are not interested in shape of a signal , but we are interested in which different frequency signals got mixed to generate this shape ???

So in frequency domain we are interested in different individual frequencies and their power values ( amplitude ).

To get these frequencies we do FFT.

There is something called Fourier transform , Discrete Fourier transform in signal processing.

But FFT which is fast Fourier transform that is something we can do in microcontroller, as it works on finite set of sample numbers and not on infinite samples.

FFT is basically multiplying a unit signal of certain frequency with a given signal to check if that signal is present in that signal or not.

If that signal in present we will get value otherwise zero.


11) Voltage , current sine wave formula :

V = Vmax sin ( 2*pi*f*t )

V = Imax sin ( 2*pi*f*t )

Basically “t” decides the shape of signal , everything else is fixed , f, Vmax and Pi.


12 ) Power factor :

As we discussed earlier current mostly leads or lags the voltage based on inductive or capacitive loads.

This difference of angle between voltage and current is phi. If you take cosine it is called power factor.

Power factor is Cos(phi).


13) Current and power factor :

As voltage is our reference, current is  I*cos(phi) .  as it is already shifted with certain factor.

Remember full wave is 2*pi ( 360 ).

Ideal power factor is “1” so phi need to be “0” degree , means voltage is in sync with current.


14) Voltage measurement circuitry:

To measure voltage, you need to decrease the voltage to bring in the range of ADC.

There are 2 method to do this: voltage transformer or resistor divider. Voltage transformer provides isolations between input and output. But resistor divider does not offer those isolation.

Most of the cheap multimeter uses register dividers. As voltage transformer is bulky and expensive.


14) Current measurement circuitry:

For current measurement you need to bring current down using a current transformer then use a shunt to convert this current into voltage ( V = IR ) as our ADC only read voltage.


15) Types of Isolations:

if you want to separate your grounds you need to use certain isolations.

Isolations can be either optical or Electromagnetic. Opto isolators are example of optical isolation, a transformer is electromagnetic isolation.


16) Voltage translators:

When one of your device understands one voltage levels and other device understand different voltage levels then you need voltage translators to both can talk.

This are RS232 levels:

Data circuits

Control circuits

Voltage

0 (space)

Asserted

+3 to +15 V

1 (mark)

Deasserted

−15 to −3 V


But for TTL levels +5V is logical 1 and 0V is logical 0. So, you need some voltage translator. Max232 is type of voltage translator.

17) Measuring DC voltage:

DC voltage measurement is very is easy you can take multiple samples and take average , the more samples you can better the accuracy.

18) Measuring frequency:

Frequency = 1 / time period. So in AC signal you know your sampling rate i,e time between two samples , then you know total samples between two zero crossing . So you count total number of samples between two zero crossing and calculate time period. Then do reciprocal of time-period this will give you frequency.

19) Calibrating your measurements:

Calibrations are done based on straight line formula, so you calculate 2 factors. offset factors and multiplier factor. Based on linearity of your measuring instruments you might need multiple multiplier factors.

Besides this you might need to calibrate your power factor calculations as well. (power factor calibration is little complex) , you need to read rotation matrix for this :

< https://en.wikipedia.org/wiki/Rotation_matrix >

20) Linearity of measurement:

Linearity depends upon many factors. But resistors are ideally considered linear and transformers have non-linearity in response. Besides this temperature also affects linearity.

Saturday 2 January 2021

Doing stack analysis in embedded development with microchip XC16 compilers


I have embedded a link to scribd document , you can download project from here.

https://drive.google.com/file/d/1bZk5itbOjWm2hmhSO9jEo1DmVA4ZfjVm/view?usp=sharing >

To see document in full screen you can press "Full screen" button down.

Let me know your views on stack analysis in embedded development.


Tracking Stack Usage in XC16 by parth pandya