
Sunday, 19 February 2012
Saturday, 18 February 2012
How to upload results on a blog with javascript

Generally server side programming is used to upload results of institutes because it requires access into the database. Most of the educational institutes have their PHP supported sites on which they upload the results. And yes PHP supported web plans are not available for free you have to purchase it. And even if you find one you must know PHP to upload results.
But now consider that you are running a small institute like tuitions and you don’t have your website and you want to put results of your students online.
To upload results online here I am using JavaScript. This method does not require server side programming. For this you must have a blog because blogging is very easy to use even for those who do not know HTML, JAVASCRIPT, and CSS etc. So here I am using “blogger.com” and my blog is “pandyaelectronics.blogspot.com”. Steps are as follow:
1) Go to blogger.com and create your blog using your Google account. Follow instructions.
2) Now go to new post you will find a screen like this.

3) click on “edit HTML”. in this window you can use HTML ,JAVASCRIPT, and CSS.
4) now copy past following JavaScript code .and click on “publish post”. Now you are able to see the results.
Code:
<script type="text/javascript">
function know(n1,n2)
{
var num1=parseFloat(n1);
var num2=parseFloat(n2);
var str= n1;
var last=str.charAt(str.length-1);
if(n2=="" && n1=="")
{
alert("please give either seat number or enrollment number");
return false;
}
else if(n1=="" && n2!="")
{
alert("please try your enrollment number");
return false;
}
else if(last==1)
{
var mark=["AB","BB","AA","BC","BB","BB"];
}
else if(last==2)
{
var mark=["AA","AA","AA","AA","AA","AA"];
}
else if(last==3)
{
var mark=["BB","AA","BB","BB","BC","AB"];
}
else if(last==4)
{
var mark=["BC","BC","BB","AB","AA","AB"];
}
else if(last==5)
{
var mark=["AA","BB","AB","BB","AB","BC"];
}
else if(last==6)
{
var mark=["AB","BC","BC","AA","AB","BB"];
}
else if(last==7)
{
var mark=["BC","AA","AA","AB","BB","BC"];
}
else if(last==8)
{
var mark=["BB","AA","AB","AB","BB","BC"];
}
else if(last==9)
{
var mark=["AA","AB","BB","BB","BB","BC"];
}
else if(last==0)
{
var mark=["BB","AA","AA","BB","BC","BC"];
}
document.write("<center><h2><font color=red>EXAM B.E. SEM-5(DEC-2011)</font></h2></center>")
document.write("</br>")
document.write("<center>")
document.write("<table cellspacing=0 cellpading=0 border=1>")
document.write("<tr bgcolor=>")
document.write("<td><h3 >NAME OF STUDENT </h3></td>")
document.write("<td ><h3><center>")
document.write("LOADING . . . ")
document.write("</center></h3></td>")
document.write("</tr>")
document.write("<tr>")
document.write("<td width=200pt >BRANCH </td>")
document.write("<td> <center>ELECTRONICS & COMMUNICATION</center></td>")
document.write("</tr>")
document.write("<tr>")
document.write("<td >ENROLMENT NO </td>")
document.write("<td><center>")
document.write(num1)
document.write("</center><td>")
document.write("</tr>")
document.write("</table>")
document.write("</br>")
document.write("<table cellspacing=0 cellpading=0 border=1>")
document.write("<tr bgcolor=#DDDDE6>")
document.write("<td width=100pt><center> SUBJECT CODE </center> </td>")
document.write("<td width=400pt><center> SUBJECT </center> </h3></td>")
document.write("<td wigth=50pt> COURSE<br>CREADIT </td>")
document.write("<td width=50pt> MARKS </td>")
document.write("</tr>")
document.write("<tr>")
document.write("<td><h4><center> 151003 </center> </h4></td>")
document.write("<td><h4><center>Integrated Circuits and Applications </center> </h4></td>")
document.write("<td><h4><center>06 </center> </h4></td>")
document.write("<td><h4><center>")
document.write(mark[0])
document.write("</center></h4></td>")
document.write("</tr>")
document.write("<tr>")
document.write("<td><h4><center> 150001 </center> </h4></td>")
document.write("<td><h4><center>Management-II </center> </h4></td>")
document.write("<td><h4><center>02 </center> </h4></td>")
document.write("<td><h4><center>")
document.write(mark[1])
document.write("</center></h4></td>")
document.write("</tr>")
document.write("<tr>")
document.write("<td><h4><center> 151001 </center> </h4></td>")
document.write("<td><h4><center>Microcontroller and Interfacing </center> </h4></td>")
document.write("<td><h4><center>05 </center> </h4></td>")
document.write("<td><h4><center>")
document.write(mark[2])
document.write("</center></h4></td>")
document.write("</tr>")
document.write("<tr>")
document.write("<td><h4><center> 151002 </center> </h4></td>")
document.write("<td><h4><center> Engineering Electromagnetics</center> </h4></td>")
document.write("<td><h4><center>03 </center> </h4></td>")
document.write("<td><h4><center>")
document.write(mark[3])
document.write("</center></h4></td>")
document.write("</tr>")
document.write("<tr>")
document.write("<td><h4><center> 151004 </center> </h4></td>")
document.write("<td><h4><center> Electronic Communication</center> </h4></td>")
document.write("<td><h4><center>06 </center> </h4></td>")
document.write("<td><h4><center>")
document.write(mark[4])
document.write("</center></h4></td>")
document.write("</tr>")
document.write("<tr>")
document.write("<td><h4><center>150906 </center> </h4></td>")
document.write("<td><h4><center> Electric power utilization & traction</center> </h4></td>")
document.write("<td><h4><center>06 </center> </h4></td>")
document.write("<td><h4><center>")
document.write(mark[5])
document.write("</center></h4></td>")
document.write("</tr>")
document.write("</table>")
document.write("<br>")
document.write("<table cellspacing=0 cellpading=0 border=1>")
document.write("<tr>")
document.write("<td width=100pt bgcolor=#DDDDE6><h4><center>SPI </center></h4></td>")
document.write("<td width=100pt><h4><center> 10</center> </h4></td>")
document.write("<td width=100pt bgcolor=#DDDDE6><h4><center>CPI</center> </h4></td>")
document.write("<td width=100pt><h4><center>10</center> </h4></td>")
document.write("</tr>")
document.write("</table>")
document.write("</center>")
document.write("<center><h1><font color=green>congratulation!! you have passed this exam.</font></h1></center>")
document.write("<br>")
document.write("<font color=red font-size=+2><center><a href=http://www.facebook.com/pages/PandyaElectronics/153508891431816><b>Disclaimer:</b>This is just for enjoyment purpose and have no concern with any university or college.If you like This please join us on facebook</br><h2>Pandya Electronics</h2></a></font> ")
return true
}
</script>
<body BGCOLOR="">
<form name="frm" method="post" >
<br><br><br><br>
<center><h2><font color=green>EXAM B.E. SEM-5(DEC-2011)</font></h2></center><br>
<center><h3><FONT COLOR="BLUE">ENTER YOUR ENROLLMENT NUMBER:</h3></FONT></center><br>
<center><input type="text" name="no1" size="15" maxlength="12"></center><br>
<center><h3><FONT COLOR="BLUE">OR SEAT NUMBER:</FONT></h3></center><br>
<center><input type="text" name="no2" size="15" maxlength="9"></center><br>
<center><input type="button" name="go" value="SELECT" onClick="know(no1.value,no2.value)"></center>
<br>
<br>
<center><h3><font color=green>Fill any detail and then click "select"</font></h3></center><br>
</form>
</body>
|
5)this will give you a look like this.Enter number and get results.

Sunday, 12 February 2012
Comparison between various programming circuit and common problems while making programmer
Before reading this article I want to tell this article is very childish but I think that not everyone study in IITs,NITs,BITs,and other good colleges where good guidance is easily available.So you can say That this article is childish but this is list of all problems that I found while making a programmer.
Comparison between various programmer circuit:
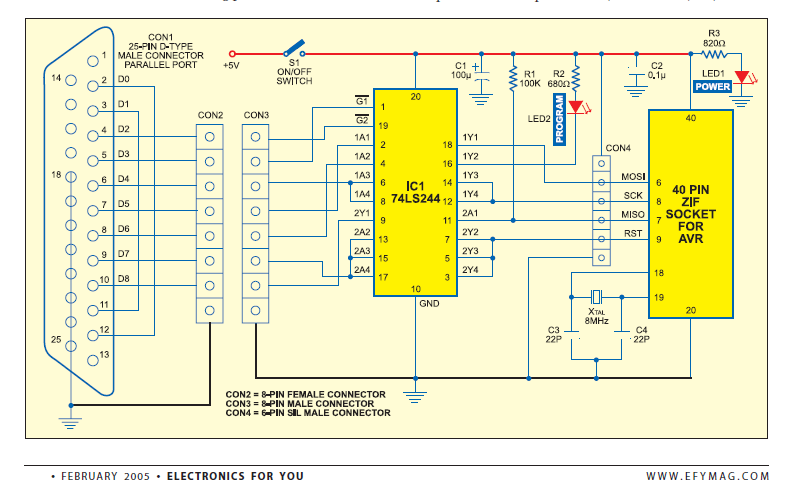
This is the programmer published in electronics for you magazine. Obviously this is working and a very fine circuit. Here IC 74LS244 is a buffer IC or line driver IC. Buffer performs following functions:
1) Isolates circuit from each other. In our case it isolates PC parallel port from microcontroller circuit and vise versa.
2) It improves current sourcing capability means now you are able to use longer cables.It's true than parallel ports are not able supply current over long distance and use of longer cable in common problem in making the programmer.But for us 20cm cable is enough don't use longer cables.

This one is another programmer circuit here instead of 74244 here another buffer IC 74541 is used. Both 74244 & 74541 have same function which is mentioned above. Both of these ICs are not pin compatible.

IN above circuit there is no buffer used only few resistors are used which limits the current and avoid damage to the pins of 8051 and wise versa.

This one is my circuit in which only connections are made between LPT port and microcontroller
Problems in making programmer:
1) BAD SOLDERING: first of all you must have some good soldering skills when you make programmer because most of the problem arises due to bad soldering.
2) USE OF BREAD BOARD: it may happen that you may get success on bread board but you are not lucky all the time.
3) WRONG CONNECTIONS: if you don’t get any success then check whether all the connections are okay or not.
3) WRONG CONNECTIONS: if you don’t get any success then check whether all the connections are okay or not.
4) DO NOT COMPLICATE STAY SIMPLE: there may be many fancy circuits available on the internet but chose the simplest one.(like MINE)
If you don’t get success in first attempt don’t be disappoint there are lot’s of people who don’t get their programmer work in first attempt .So just keep trying. Happy programming.
Motor direction control with DPDT switch
This article describes how you can control direction of DC motor using DPDT switch. This is one the simplest method for controlling direction of DC motor.
What is DPDT switch?
DPDT stands for “double pole double throw”. Now let’s understand what is pole and throw.
Pole:
It basically indicates number of movable contacts. Concept will be clear from following figures
Throw:
Number of way the switch can conduct. DPDT can conduct two ways that is why it is double throw. Simple switches used in our house have single throw because it can conduct only one way.


Saturday, 11 February 2012
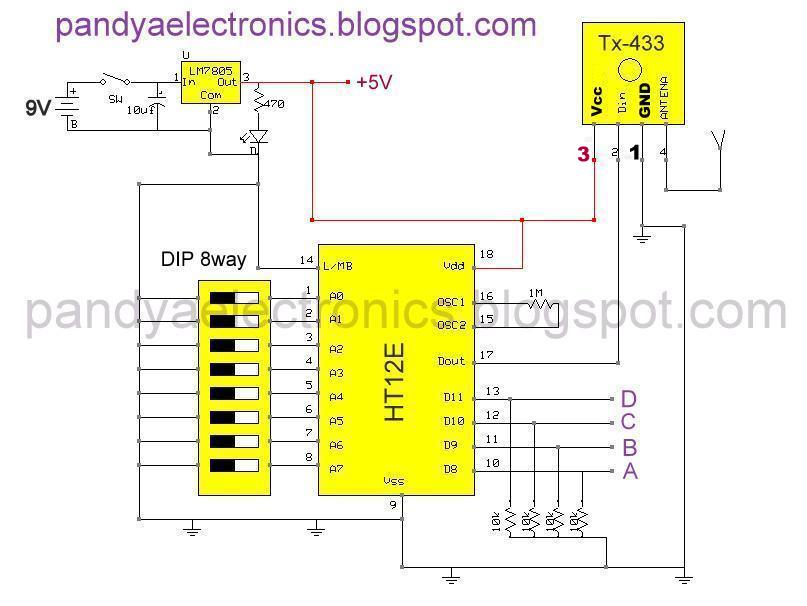
A remote controled land rover(100% verified)
circuit diagram:
Transmitter:
 receiver:
 DPDT connections:
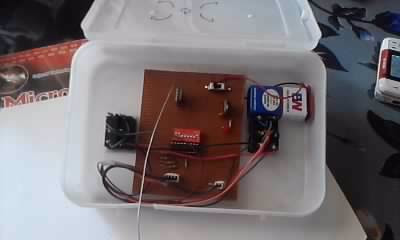
 PANDYAelectronics prototye:
receiver:
 transmiter(remote):

DPDTs:
 Everything:
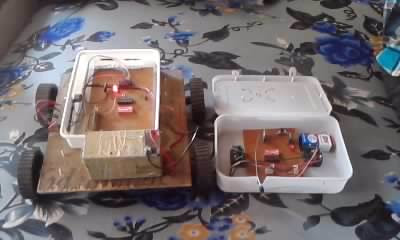 and a complete land rover:
 Cheek out video:
Resources: The complete construction of a land rover from Electronics For You Download:
Transmitter:
receiver:

DPDTs:

Resources: The complete construction of a land rover from Electronics For You Download:
pls comment for any guidance.
Programer for 8051(AT89S52) using parallel port

This article shows how to program 8051 using parallel port of computer. I used AT89S52 chip. which have 8052 core .So let’s see what is more in 8052.
AT89S51 | AT89S52 | |
Flash memory | 4k | 8k |
Ram | 128x8 | 256x8 |
Timer/counter | Two | Three |
Total interrupts | Six(with reset) | Eight(with reset) |
endurance | 1000 Write/Erase Cycles | 10000 Write/Erase Cycles |
External interrupts | two | two |
Memory lock | Three level | Three level |
DPTR | dual | dual |
So,AT89S52 is a nice chip. You can also select other chip but always select the chip which supports serial programming.IN clear words never use AT89C51/52 always use AT89S51/52.
SFR locations in AT89S52:

Here rounded ones are additional SFRs over standard 8051 family.
Circuit Diagram:
Main board:
Con1-con4 are 8 pin SIL(single in line) male connecters. Con5 is 6 pin SIL female and con6 is 6 pin SIL male connecters. I have used SIL connectors but you can use headers also however soldering headers on general purpose boards are very complicated. Instead of buying separate connectors you can buy a berg strip and cut them to get desired pins.


Berg strip
DB25 connection:


POWER supply:
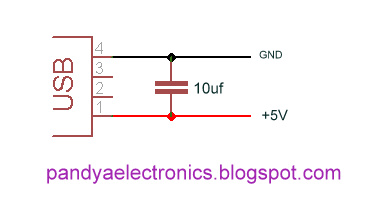
You can power your circuit with battery or mobile charger or any other homemade regulators. but I have used USB power supply .USB socket of PC supplies +5V which can be directly applied to micro. Just get any old data cable of your mobile phone cut from one side and you will find a red and a black wire.

The entire setup:


Software:
COMPILER:
I have used keil micro vision compiler for my all programming. You can either visit my blog or just check my scribd account you will find useful information for kiel compiler.
Programming software:
I have used ISP programmer developed by asim khan to burn the program in microcontroller. I had also tried pony prog but it don’t work for me. So use Asim khan programmer it very good software.

Download links:
Awesome LED projects with 8051


I like playing with LEDs but mostly when you search about LED project with 8051 you will only get only “blinking LEDs with 8051”.here I present some awesome LED projects. So enjoy. All the codes are written by me.
Circuit diagram:

Description:
For all LED projects I used combination of 4 green and 4 red LEDs. For these projects I used negative logic i.e. when 8051 will supply ‘0’ LED will glow and when ‘1’ they don’t. Because 8051 have poor current sourcing capability and good current sinking capability.330 ohm resisters are used to restrict the current through LEDs .If you don’t get desired brightness then use LEDs without resisters. Power on reset circuitry is used here however you can connect a push –to-on button for manual reset.
Code:
Micro: AT89S52
Code language: embedded C
Compiler: kiel micro vision
Programming software: ISP programmer by Asim Khan
Programming hardware: Homemade (using Atmel ISP cable)you can visit my blog for this detail.
Note : following program produce different effects so load them one by one. for direct ready to burn hex codes visit our blog.
Program:1
#include<reg51.h> //declaratiobn of LED names sbit r1=P0^0; sbit g1=P0^1; sbit r2=P0^2; sbit g2=P0^3; sbit r3=P0^4; sbit g3=P0^5; sbit r4=P0^6; sbit g4=P0^7; // declaring delay function void delay(int time) //This function produces a delay in msec. { int i,j; for(i=0;i<time;i++) for(j=0;j<1275;j++); } void main( ) { int n=50; while(1) { //forward movment g1=1,g2=1,g3=1,g4=1; r1=0,r2=1,r3=1,r4=1; delay(n); g1=0; delay(n); r2=0; delay(n); g2=0; delay(n); r3=0; delay(n); g3=0; delay(n); r4=0; delay(n); g4=0; delay(n); //reverse movement g1=1,g2=1,g3=1,g4=0; r1=1,r2=1,r3=1,r4=1; delay(n); r4=0; delay(n); g3=0; delay(n); r3=0; delay(n); g2=0; delay(n); r2=0; delay(n); g1=0; delay(n); r1=0; delay(n); } } |
Program:2
#include<reg51.h> //declaratiobn of LED names sbit r1=P0^0; sbit g1=P0^1; sbit r2=P0^2; sbit g2=P0^3; sbit r3=P0^4; sbit g3=P0^5; sbit r4=P0^6; sbit g4=P0^7; // declaring delay function void delay(int time) //This function produces a delay in msec. { int i,j; for(i=0;i<time;i++) for(j=0;j<1275;j++); } void main(void) { n=50; while(1) { g1=1,g2=1,g3=1,g4=1; r1=0,r2=1,r3=1,r4=1; delay(n); g1=0,r1=1; delay(n); g1=1;r2=0; delay(n); r2=1,g2=0; delay(n); g2=1,r3=0; delay(n); r3=1,g3=0; delay(n); g3=1,r4=0; delay(n); r4=1,g4=0; delay(n); } } |
Cheak out videos:
Subscribe to:
Comments (Atom)